How to Make a Kick Drum with the Web Audio API
Originally published on Web Audio Studio blog.
Most kicks you hear are samples. But under the hood, a kick can be surprisingly simple: a falling sine wave for the body, and a tiny burst of noise for the click.
That is what makes kick synthesis so satisfying. Instead of scrolling through sample packs, you can build the sound from first principles, understand exactly why it hits the way it does, and shape every part of it to fit your track.
This matters even more if you work with the Web Audio API, because these sounds are not magic. They come from a few small building blocks you can wire together, automate, and tweak in real time.
Open the live graph in Web Audio Studio → and hear it before reading the code.
How a kick drum works
The body starts as a simple sine oscillator. Right after the hit, its pitch falls fast from about 150 Hz to 40 Hz in roughly 50 ms. That quick drop is what gives the kick its heavy “boom.” At the same time, the volume fades down, so the body feels like a short drum hit instead of a constant tone.
The click sits on top of that body. We make it from white noise, then shape it with a band-pass filter around 2 kHz and a very short gain envelope. The result is a small bright transient at the start of the sound, which helps the kick cut through the mix. After that, both layers go through their own gain nodes and are mixed into one output.
The audio graph
Here’s the full node layout we’ll build:
| Node | Role |
|---|---|
OscillatorNode | Sine wave — the body of the kick |
AudioWorkletNode | White noise generator — the click transient |
BiquadFilterNode | Band-pass filter shaping the noise |
GainNode (sine) | Amplitude envelope for the body |
GainNode (noise) | Amplitude envelope for the click |
GainNode (mix) | Merges both layers |
GainNode (master) | Final output level |
AudioDestinationNode | Speakers |
This is the mental shift that makes the Web Audio API click: we are not creating a brand new sound every time the kick plays. We build the graph once, keep the oscillator and noise source running, and then shape that live signal over time with gain and frequency automation. In other words, we are not triggering a clip, we are sculpting a sound.
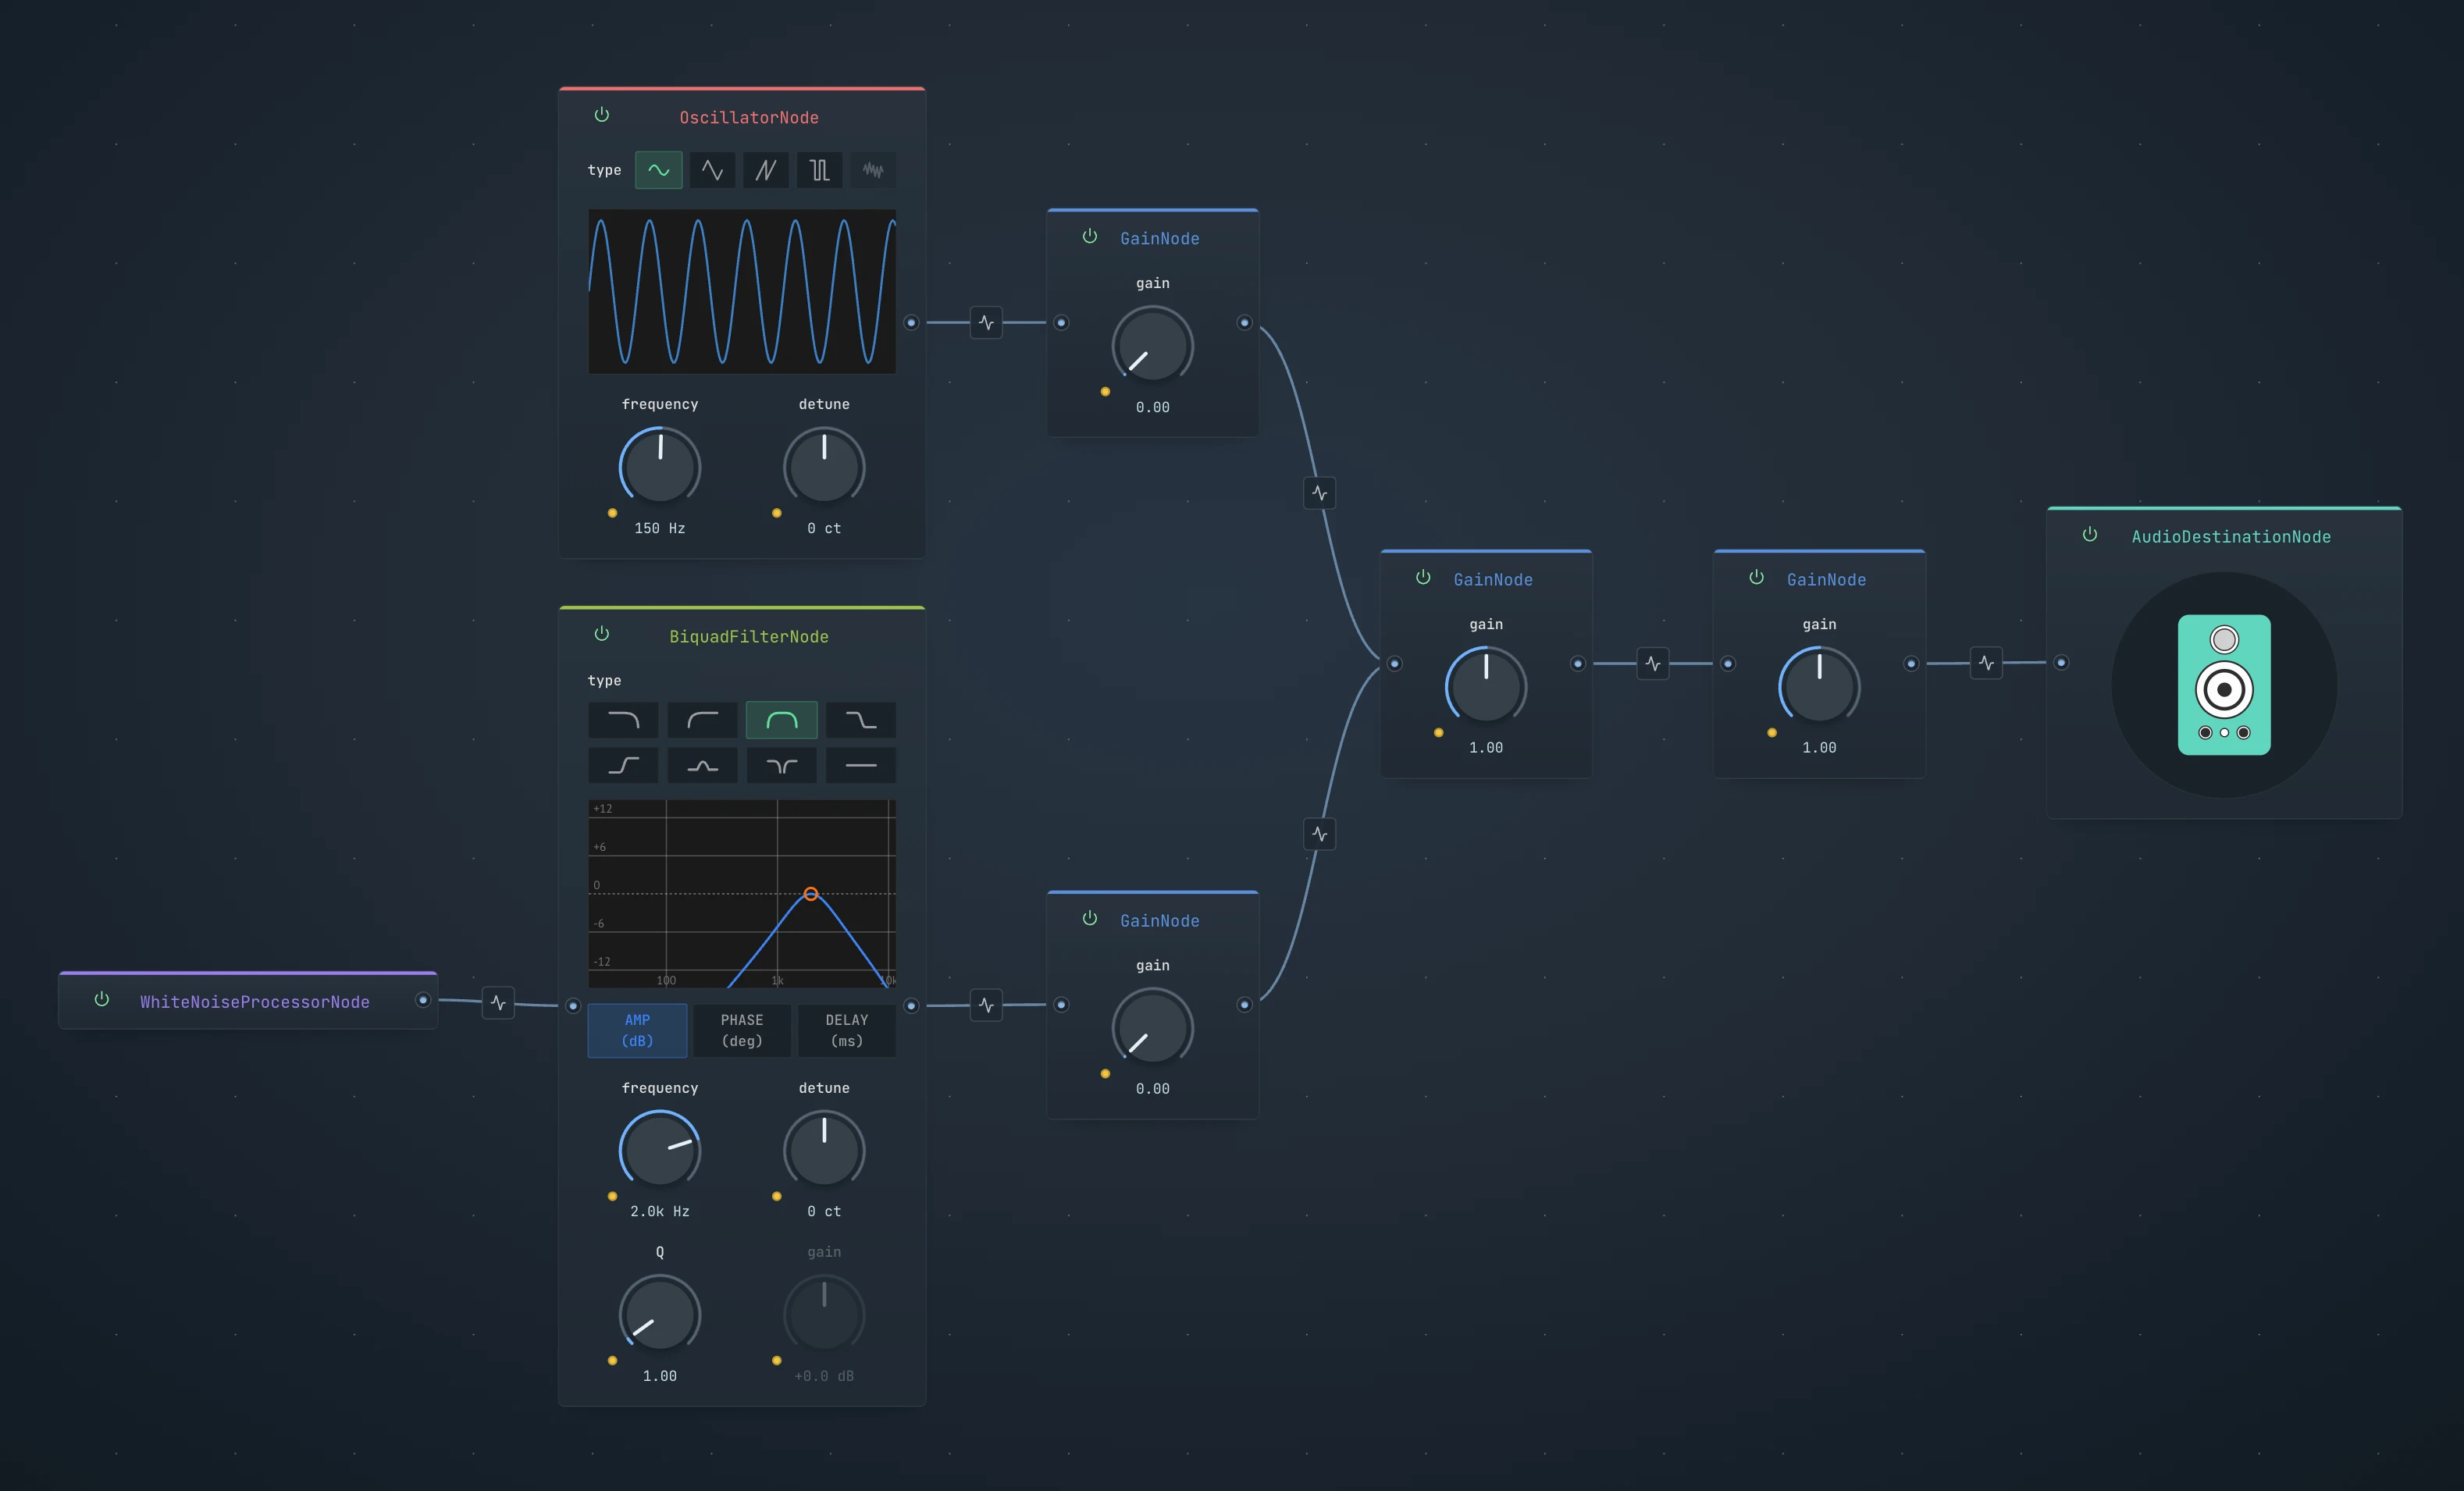
Here is what this audio graph looks like visually:
Building it step by step
1. Start with one sine oscillator
The simplest kick starts with one sine oscillator. We connect it straight to the output and start it.
An oscillator is just a sound source that generates a repeating waveform. Here it gives us a steady sine tone, which will become the low body of the kick.
This gives us a plain low sine tone. It is not a real kick yet, but it gives us the low body we need.
What you should hear: a flat low tone that keeps going. It has weight, but it does not feel like a drum hit yet.
The code examples in this article use plain Web Audio API code to keep the signal flow easy to see. In a real app, you usually create or resume the
AudioContextfrom a user action like a button click, because many browsers block audio until the user interacts with the page.
const ctx = new AudioContext();

const sineOsc = ctx.createOscillator();
sineOsc.type = "sine";
sineOsc.frequency.value = 150;

sineOsc.connect(ctx.destination);

sineOsc.start();
Open this step in Web Audio Studio and hear the raw oscillator →
2. Schedule the pitch drop
Now we make the sound change over time.
A kick sounds like a kick because the pitch moves very fast right after the hit. It starts higher, then drops down in a few milliseconds. That fast pitch drop gives the sound its kick shape, and once the oscillator falls low enough, the tail becomes much less audible on many speakers.
This already sounds much closer to a kick, even though we are still using only one oscillator.
What you should hear: the front of the sound drops fast, and the tail fades into a low rumble. It still feels unfinished, but now it starts to resemble a kick.
const ctx = new AudioContext();

const sineOsc = ctx.createOscillator();
sineOsc.type = "sine";
sineOsc.frequency.value = 150;

sineOsc.connect(ctx.destination);

sineOsc.start();

const when = ctx.currentTime;

sineOsc.frequency.setValueAtTime(150, when);
sineOsc.frequency.exponentialRampToValueAtTime(40, when + 0.05);
Open this step in Web Audio Studio and hear the pitch drop →
3. Add a gain envelope to the sine body
The pitch drop gets us closer to a kick, but the oscillator is still running all the time. Now we add sineGain so the body can fade in and fade out like a real drum hit.
This is the amplitude envelope of the body. In synth terms, this is the part that behaves like a very simple ADSR (Attack, Decay, Sustain, Release).
const ctx = new AudioContext();

const sineOsc = ctx.createOscillator();
sineOsc.type = "sine";
sineOsc.frequency.value = 150;

const sineGain = ctx.createGain();
sineGain.gain.value = 0;

sineOsc.connect(sineGain);
sineGain.connect(ctx.destination);

sineOsc.start();

const when = ctx.currentTime;

sineOsc.frequency.setValueAtTime(150, when);
sineOsc.frequency.exponentialRampToValueAtTime(40, when + 0.05);

sineGain.gain.setValueAtTime(0, when);
sineGain.gain.linearRampToValueAtTime(1, when + 0.005);
sineGain.gain.exponentialRampToValueAtTime(0.001, when + 0.4);
sineGain.gain.setValueAtTime(0, when + 0.401);
Open this step in Web Audio Studio and hear the body take shape →
What you should hear: this is the point where the sound stops feeling like a synth test and starts feeling like a real low drum hit.
If you only change a few things here, change these:
150is a balanced starting pitch. Try120for a rounder, softer front, or180for a more aggressive hit.40is where the body settles. Try30for more sub weight, or50if you want the tail to stay more audible on small speakers.0.05gives a natural pitch fall. Try0.03for a tighter, more techno-like kick, or0.08for a longer drop that starts leaning toward an 808-style feel.0.4gives a medium-length body. Try0.2for a shorter, drier kick, or0.7for a longer low-end tail.
The other values matter too, but these four will teach you the sound of the patch fastest. Once those make sense, you can explore the smaller details in Web Audio Studio.
4. The body is ready, but it still needs a click
At this point the low body works, but the kick is still too soft and too smooth. Real kicks usually have a short click at the start. That click helps the ear find the transient, and it helps the kick cut through the mix, especially on small speakers.
We will make that click with a very short burst of filtered white noise.
White noise is a random signal that contains lots of frequencies at once. On its own it sounds like hiss. If we shape it with a filter and a very fast gain envelope, it becomes a useful click.
To generate white noise cleanly in Web Audio, we will use an AudioWorkletProcessor.
What you should hear: on its own, white noise sounds like plain hiss. It is not musical yet, but it gives us the raw material for the click.
class WhiteNoiseProcessor extends AudioWorkletProcessor {
  process(inputs, outputs) {
    const output = outputs[0];
    for (let channel = 0; channel < output.length; channel++) {
      const buf = output[channel];
      for (let i = 0; i < buf.length; i++) {
        buf[i] = Math.random() * 2 - 1;
      }
    }
    return true;
  }
}

registerProcessor("white-noise-processor", WhiteNoiseProcessor);
5. Load the worklet in the main file
Now we load that processor and create a node from it. This gives us a live white-noise source inside our main graph.
In a real project,
white-noise-processor.jsneeds to be served as a real file URL. A simple option is to put it in/publicand load it as/white-noise-processor.js.
await ctx.audioWorklet.addModule("/white-noise-processor.js");

const noise = new AudioWorkletNode(ctx, "white-noise-processor", {
  numberOfInputs: 0,
  numberOfOutputs: 1,
});
6. Route both sources into the output
Before we shape the click further, it helps to put both sound sources into the same output path. We will use a mix bus and a master gain, then connect both the sine body and the raw noise into that chain.
This gives us one place to combine layers and one final output before ctx.destination.
const mix = ctx.createGain();
const master = ctx.createGain();

sineOsc.connect(sineGain);
sineGain.connect(mix);

noise.connect(mix);
mix.connect(master);
master.connect(ctx.destination);
Open this step in Web Audio Studio and hear both layers together →
Right now this will sound like the sine body plus raw white noise. The routing is in place, but the noise is still too broad. In the next step we will focus its tone, and after that we will shape its timing.
What you should hear: a kick-like low body, but with a noisy layer on top that is still too wide and too messy.
7. Filter the noise
Raw white noise contains low, mid, and high frequencies. For a kick click, we do not want all of that. We only want a small band that feels sharp and bright.
That is why we use a band-pass filter. It keeps a focused slice of the noise and removes the rest.
const noiseFilter = ctx.createBiquadFilter();
noiseFilter.type = "bandpass";
noiseFilter.frequency.value = 2000;
noiseFilter.Q.value = 1;
2000 Hz puts the click in the upper mids, where the attack is easy to hear. Q controls how narrow or wide the band is. Q = 1 keeps the band fairly wide, so it still sounds natural.
What you should hear: the noise should stop sounding like broad hiss and start sounding more focused, brighter, and more useful as an attack layer.
Now the click has the right color, but not the right shape. The next step is to make it short enough to behave like a real transient.
8. Shape the click with its own gain envelope
Now we give the noise path its own gain node, just like we did for the sine body. This lets us open the click for a tiny moment and then shut it off again.
const noiseGain = ctx.createGain();
noiseGain.gain.value = 0;

noise.connect(noiseFilter);
noiseFilter.connect(noiseGain);

const when = ctx.currentTime;

noiseGain.gain.setValueAtTime(0, when);
noiseGain.gain.linearRampToValueAtTime(0.9, when + 0.001);
noiseGain.gain.exponentialRampToValueAtTime(0.001, when + 0.07);
noiseGain.gain.setValueAtTime(0, when + 0.071);
These values are doing the same kind of work as the body envelope, just much faster:
0.9atwhen + 0.001→ the click opens almost instantly, in 1 ms.0.001atwhen + 0.07→ the click fades over 70 ms.0atwhen + 0.071→ one millisecond later it is forced to full silence.
The result is a short bright transient on top of the low sine body.
What you should hear: the kick should suddenly become easier to spot. Even if the body stays the same, the front edge now feels sharper and more defined.
At this point the click itself is ready. The last step is just to replace the old raw-noise route with this finished click path.
9. Route the click into the main output
The click is now shaped, so the last step is to update the routing code.
The sine body is already going through mix, master, and ctx.destination. At this point, you can remove the old noise.connect(mix) line from step 6 and replace it with the final click route below.
noise.connect(noiseFilter);
noiseFilter.connect(noiseGain);
noiseGain.connect(mix);
Open this step in Web Audio Studio and hear the finished kick →
At this point, the kick is fully built.
What you should hear: a full kick shape with a low body and a clear front click, instead of a sine tone with some noise on top.
Full code
Here is the whole example split into the two files you need.
Main file
const ctx = new AudioContext();

await ctx.audioWorklet.addModule("/white-noise-processor.js");

const sineOsc = ctx.createOscillator();
sineOsc.type = "sine";
sineOsc.frequency.value = 150;

const sineGain = ctx.createGain();
sineGain.gain.value = 0;

const noise = new AudioWorkletNode(ctx, "white-noise-processor", {
  numberOfInputs: 0,
  numberOfOutputs: 1,
});

const noiseFilter = ctx.createBiquadFilter();
noiseFilter.type = "bandpass";
noiseFilter.frequency.value = 2000;
noiseFilter.Q.value = 1;

const noiseGain = ctx.createGain();
noiseGain.gain.value = 0;

const mix = ctx.createGain();
const master = ctx.createGain();

sineOsc.connect(sineGain);
sineGain.connect(mix);

noise.connect(noiseFilter);
noiseFilter.connect(noiseGain);
noiseGain.connect(mix);

mix.connect(master);
master.connect(ctx.destination);

sineOsc.start();

const when = ctx.currentTime;

// Sine body
sineOsc.frequency.setValueAtTime(150, when);
sineOsc.frequency.exponentialRampToValueAtTime(40, when + 0.05);

sineGain.gain.setValueAtTime(0, when);
sineGain.gain.linearRampToValueAtTime(1, when + 0.005);
sineGain.gain.exponentialRampToValueAtTime(0.001, when + 0.4);
sineGain.gain.setValueAtTime(0, when + 0.401);

// Noise click
noiseGain.gain.setValueAtTime(0, when);
noiseGain.gain.linearRampToValueAtTime(0.9, when + 0.001);
noiseGain.gain.exponentialRampToValueAtTime(0.001, when + 0.07);
noiseGain.gain.setValueAtTime(0, when + 0.071);
white-noise-processor.js
class WhiteNoiseProcessor extends AudioWorkletProcessor {
  process(inputs, outputs) {
    const output = outputs[0];
    for (let channel = 0; channel < output.length; channel++) {
      const buf = output[channel];
      for (let i = 0; i < buf.length; i++) {
        buf[i] = Math.random() * 2 - 1;
      }
    }
    return true;
  }
}

registerProcessor("white-noise-processor", WhiteNoiseProcessor);
Open the full patch in Web Audio Studio → and tweak every parameter in real time.
Tweaking the sound
In Web Audio Studio you can tweak values right on the nodes, or edit the code directly and listen again. The best way to learn this patch is to change one thing at a time and listen for one clear result.
- Change the body start pitch in
sineOsc.frequencyfrom150to120if you want a rounder, softer kick. Push it to180if you want the hit to feel sharper and more aggressive. - Change the body end pitch in
sineOsc.frequencyfrom40to30if you want more sub weight. Push it to50if you want the tail to stay easier to hear on small speakers. - Change the pitch drop time from
0.05to0.03if you want a tighter, punchier kick that starts to feel more techno-like. Push it to0.08if you want a longer drop that leans more toward an 808-style shape. - Change the body attack in
sineGain.gainfrom0.005to0.001if you want a harder front edge. Push it to0.01if you want the hit to feel softer and less sharp. - Change the body decay in
sineGain.gainfrom0.4to0.2if you want a short, dry kick. Push it to0.7if you want a longer low-end tail. - Change the click level in
noiseGain.gainfrom0.9to0.3if you want the attack to sit back. Keep it high if you want the kick to cut through a dense mix. - Change the click decay in
noiseGain.gainfrom0.07to0.03if you want a tiny, tight tick. Push it to0.12if you want a noisier, more acoustic-style attack. - Change the click tone in
noiseFilter.frequencyfrom2000to1200if you want a darker click. Push it to3500if you want a brighter, snappier attack. - Change
noiseFilter.Qfrom1to0.7if you want a wider, smoother click. Push it to3if you want a narrower, more focused tone. - Change
master.gainif the whole patch is too loud, instead of rebalancing every layer by hand.
Optional: Loop it with proper Web Audio scheduling
Calling those automation lines once with const when = ctx.currentTime is fine for testing, but a real beat needs repeated hits. At that point it makes sense to wrap everything in a playKick(when) function, because we no longer want to schedule “right now” every time. We want to schedule each hit at an exact future time like nextTime.
The first idea many people try is setInterval() or repeated calls from the UI thread. That works at first, but it can drift and jitter when the page is busy.
The Web Audio clock is much more stable than the main JavaScript thread. So instead of triggering the sound exactly at “now”, we check the clock often and schedule notes a little bit ahead.
That is what this lookahead scheduler does:
- it wakes up every
25 ms - it looks
100 msinto the future - it schedules every kick that should happen in that window
This is why the timing stays tighter, even when the browser is doing other work.
You can read more about this idea in Chris Wilson’s A Tale of Two Clocks .
function playKick(when) {
  sineOsc.frequency.setValueAtTime(150, when);
  sineOsc.frequency.exponentialRampToValueAtTime(40, when + 0.05);

  sineGain.gain.setValueAtTime(0, when);
  sineGain.gain.linearRampToValueAtTime(1, when + 0.005);
  sineGain.gain.exponentialRampToValueAtTime(0.001, when + 0.4);
  sineGain.gain.setValueAtTime(0, when + 0.401);

  noiseGain.gain.setValueAtTime(0, when);
  noiseGain.gain.linearRampToValueAtTime(0.9, when + 0.001);
  noiseGain.gain.exponentialRampToValueAtTime(0.001, when + 0.07);
  noiseGain.gain.setValueAtTime(0, when + 0.071);
}

const bpm = 120;
const interval = 60 / bpm;
const lookahead = 0.1;     // schedule 100 ms ahead
const timerInterval = 25;  // check every 25 ms

let nextTime = ctx.currentTime;

function scheduler() {
  while (nextTime < ctx.currentTime + lookahead) {
    playKick(nextTime);
    nextTime += interval;
  }

  setTimeout(scheduler, timerInterval);
}

scheduler();
Try the full patch in Web Audio Studio → and experiment with the playKick(when) function, the nextTime scheduler, and the timing values in the lookahead loop.
You now have everything you need to build a kick from scratch: a sine wave for weight, a burst of noise for click, and a few fast automation curves to shape both into a real drum sound.
Now open the patch in Web Audio Studio and break it. Push the pitch too far, make the tail too long, brighten the click until it feels wrong, then pull it back until it hits exactly the way you want.